Preface
When we successfully execute terraform apply once and create the desired infrastructure, if we execute terraform apply again, the new execution plan generated will not contain any changes, Terraform will remember the current state of the infrastructure and apply It is compared to the desired state described by the code. When applying for the second time, because the current state is already consistent with the state described by the code, an empty execution plan will be generated
concept
1. Status file
Terraform introduces a unique concept - state management, which is not available in configuration management tools such as Ansible or self-developed tools that call the SDK to operate the infrastructure. In a nutshell, Terraform saves state information every time an infrastructure change operation is performed in a state file, which by default is stored in the terraform.tfstate file in the current working directory. For example, we declare a data and a resource in the code
data "ucloud_images" "default" {
  availability_zone = "cn-sh2-01"
  name_regex = "^CentOS 6.5 64"
  image_type = "base"
}

resource "ucloud_vpc" "vpc" {
  cidr_blocks = ["10.0.0.0/16"]
  name = "my-vpc"
}
After using terraform apply, we can see the content of terraform.tfstate
{
  "version": 4,
  "terraform_version": "0.13.5",
  "serial": 54,
  "lineage": "a0d89a84-ae5b-8e14-d61b-2d9885e3359a",
  "outputs": {},
  "resources": [
    {
      "mode": "data",
      "type": "ucloud_images",
      "name": "default",
      "provider": "provider[\"registry.terraform.io/ucloud/ucloud\"]",
      "instances": [
        {
          "schema_version": 0,
          "attributes": {
            "availability_zone": "cn-sh2-01",
            "id": "1693951353",
            "ids": [
              "uimage-xiucsl"
            ],
            "image_id": null,
            "image_type": "base",
            "images": [
              {
                "availability_zone": "cn-sh2-01",
                "create_time": "2020-01-09T11:30:34+08:00",
                "description": "",
                "features": [
                  "NetEnhanced",
                  "CloudInit"
                ],
                "id": "uimage-xiucsl",
                "name": "CentOS 6.5 64-bit",
                "os_name": "CentOS 6.5 64-bit",
                "os_type": "linux",
                "size": 20,
                "status": "Available",
                "type": "base"
              }
            ],
            "most_recent": false,
            "name_regex": "^CentOS 6.5 64",
            "os_type": null,
            "output_file": null,
            "total_count": 1
          }
        }
      ]
    },
    {
      "mode": "managed",
      "type": "ucloud_vpc",
      "name": "vpc",
      "provider": "provider[\"registry.terraform.io/ucloud/ucloud\"]",
      "instances": [
        {
          "schema_version": 0,
          "attributes": {
            "cidr_blocks": [
              "10.0.0.0/16"
            ],
            "create_time": "2020-11-16T17:00:40+08:00",
            "id": "uvnet-lu2vcdds",
            "name": "my-vpc",
            "network_info": [
              {
                "cidr_block": "10.0.0.0/16"
              }
            ],
            "remark": null,
            "tag": "Default",
            "update_time": "2020-11-16T17:00:40+08:00"
          },
          "private": "bnVsbA=="
        }
      ]
    }
  ]
}
We can see that the queried data and the created resource information are saved in the tfstate file in json format.
We have said before that due to the existence of the tfstate file, we will not perform any changes by applying again immediately after terraform apply, so what happens if we delete the tfstate file and then execute apply again? Terraform cannot read the tfstate file and will think this is the first time we have created this set of resources, so it will create all the resources described in the code again. What's more troublesome is that since the state information corresponding to the resources we created last time was deleted by us, we can no longer destroy and recycle these resources by executing terraform destroy, which actually causes resource leakage. So it is very important to keep this state file properly.
In addition, if we make some modifications to Terraform's code, the generated execution plan will change state, then Terraform will copy a current tfstate file to terraform.tfstate.backup under the same path before actually executing the change , to prevent tfstate corruption due to various accidents.
In the very early days of Terraform's development, HashiCorp tried a stateless file solution, that is, when executing the Terraform change plan, all involved resources were tagged with specific tags, and when the next change was executed, the relevant tags were read first. resources to reconstruct state information. But because not all resources support tagging, and not all public clouds support multi-tags, Terraform finally decided to use the state file scheme.
Another point is that HashiCorp has never officially disclosed the format of tfstate, that is to say, HashiCorp reserves the right to modify the format of tfstate at any time. So don't try to modify tfstate manually or with self-developed code. Terraform command line tool provides related instructions (which we will introduce later), please make sure to only operate state files through command line instructions
2. Beware: tfstate is in clear text
There is one more important thing about Terraform state that everyone considering using Terraform in a production environment must be extremely careful and vigilant about: Terraform's state files are in clear text, which means that all confidential information used in the code will be Saved in the state file in plaintext. For example, let's go back to the example of creating a UCloud host:
data "ucloud_security_groups" "default" {
  type = "recommend_web"
}

data "ucloud_images" "default" {
  availability_zone = "cn-sh2-02"
  name_regex = "^CentOS 6.5 64"
  image_type = "base"
}

resource "ucloud_instance" "normal" {
  availability_zone = "cn-sh2-02"
  image_id = data.ucloud_images.default.images[0].id
  instance_type = "n-basic-2"
  root_password = "supersecret1234"
  name = "tf-example-normal-instance"
  tag = "tf-example"
  boot_disk_type = "cloud_ssd"
  security_group = data.ucloud_security_groups.default.security_groups[0].id
  delete_disks_with_instance = true
}
We passed the value of root_password in plaintext to the code as supersecret1234. After executing terraform apply, we observed the relevant paragraphs in the tfstate file:
{
      "mode": "managed",
      "type": "ucloud_instance",
      "name": "normal",
      "provider": "provider[\"registry.terraform.io/ucloud/ucloud\"]",
      "instances": [
        {
          "schema_version": 0,
          "attributes": {
            "allow_stopping_for_update": null,
            "auto_renew": false,
            "availability_zone": "cn-sh2-02",
            "boot_disk_size": 20,
            "boot_disk_type": "cloud_ssd",
            "charge_type": null,
            "cpu": 2,
            "cpu_platform": "Intel/Broadwell",
            "create_time": "2020-11-16T18:06:32+08:00",
            "data_disk_size": null,
            "data_disk_type": null,
            "data_disks": [],
            "delete_disks_with_instance": true,
            "disk_set": [
              {
                "id": "bsi-krv0ilrc",
                "is_boot": true,
                "size": 20,
                "type": "cloud_ssd"
              }
            ],
            "duration": null,
            "expire_time": "1970-01-01T08:00:00+08:00",
            "id": "uhost-u2byoz4i",
            "image_id": "uimage-ku3uri",
            "instance_type": "n-basic-2",
            "ip_set": [
              {
                "internet_type": "Private",
                "ip": "10.25.94.58"
              }
            ],
            "isolation_group": "",
            "memory": 4,
            "min_cpu_platform": null,
            "name": "tf-example-normal-instance",
            "private_ip": "10.25.94.58",
            "remark": "",
            "root_password": "supersecret1234",
            "security_group": "firewall-a0lqq3r3",
            "status": "Running",
            "subnet_id": "subnet-0czucaf2",
            "tag": "tf-example",
            "timeouts": null,
            "user_data": null,
            "vpc_id": "uvnet-0noi3kun"
          },
          "private": "eyJlMmJmYjczMC1lY2FhLTExZTYtOGY4OC0zNDM2M2JjN2M0YzAiOnsiY3JlYXRlIjoxODAwMDAwMDAwMDAwLCJkZWxldGUiOjYwMDAwMDAwMDAwMCwidXBkYXRlIjoxMjAwMDAwMDAwMDAwfX0=",
          "dependencies": [
            "data.ucloud_images.default",
            "data.ucloud_security_groups.default"
          ]
        }
      ]
    }
It can be seen that the value of root_password supersecret1234 is written in the tfstate file in plaintext. This is something Terraform has established from the beginning of its design and will not improve for the foreseeable future. Whether you hard-code it in plaintext, use parameters (variables, which we'll cover in a later chapter), or use a function to read it from the outside world at runtime in a whimsical way, you can't change this result.
There are two solutions, one is to use a dynamic secret management tool such as Vault or AWS Secret Manager to generate a temporary effective dynamic secret (for example, the validity period is only 5 minutes, even if it is read by others, the secret has already expired); One is what we will introduce below - Terraform Backend
tfstate management scheme - Backend
So far, our tfstate file is a local file saved in the current working directory. If our computer is damaged and the file is lost, the resources corresponding to the tfstate file will be unmanageable, resulting in resource leakage.
Also, if we are a team using Terraform to manage a set of resources, how do team members share this state file? Is it possible to check the tfstate file into the source control tool to save it?
It is very wrong to check the tfstate file into the code management tool. It is like checking the database into the source code management tool. If two people check out the same tfstate at the same time, and make different changes to the code, they apply at the same time. , then trying to check tfstate into the source code management system may encounter unresolved conflicts.
In order to solve the storage and sharing problems of state files, Terraform introduces a remote state storage mechanism, that is, Backend. Backend is an abstract remote storage interface. Like Provider, Backend also supports a variety of different remote storage services:
Terraform Remote Backend is divided into two types:
- Standard: Support remote state storage and state lock
- Enhancement: Support remote operations on a standard basis (execute plan, apply, etc. operations on a remote server)
Currently, there is only one Terraform Cloud cloud service for Enhanced Backend.
The state lock means that when a change operation is performed on a tfstate, a global lock can be added to the state file to ensure that only one change can be performed at the same time. Different Backends have different support for state locks, and different mechanisms for implementing state locks. For example, consul backend uses a .lock node to act as a lock, a .lockinfo node to describe the session information corresponding to the lock, and the tfstate file is It is stored in the path node defined by the backend; the s3 backend requires the user to pass in a Dynamodb table to store the lock information, and the tfstate file is stored in the s3 bucket. The backend named etcd corresponds to etcd v2, which does not support state locks; etcdv3 provides support for state locks, and so on. Readers can choose their own suitable Backend according to the actual situation. Next, I will use consul as an example to demonstrate the Backend mechanism for readers.
1.Consul introduction and installation
Consul is an open source tool launched by HashiCorp, which is mainly used to solve problems such as service discovery, configuration center and service mesh; Consul itself also provides distributed key-value storage services such as ZooKeeper and Etcd, with final consistency based on the Gossip protocol. , so it can be used as a Terraform Backend store.
Installing Consul is very simple, if you are an Ubuntu user:
curl -fsSL https://apt.releases.hashicorp.com/gpg | sudo apt-key add -
sudo apt-add-repository "deb [arch=amd64] https://apt.releases.hashicorp.com $(lsb_release -cs) main"
sudo apt-get update && sudo apt-get install -y consul
For CentOS users:
sudo yum install -y yum-utils
sudo yum-config-manager --add-repo https://rpm.releases.hashicorp.com/RHEL/hashicorp.repo
sudo yum -y install consul
For Macos users:
brew tap hashcorp/tap
brew install hashcorp/tap/consul
For Windows users, if Chocolatey is already configured by following the Terraform installation tutorial above:
choco install consulVerification after installation is complete:
$ consulAfter installing Consul, we can start a beta Consul service:
$ consul agent -devConsul will open the Http endpoint on port 8500 of the local machine, we can access http://localhost:8500 through the browser
3. Use Backend
Let's write a simple Terraform code that can be executed for free:
terraform {
  required_version = "~>0.13.5"
  required_providers {
    ucloud = {
      source = "ucloud/ucloud"
      version = ">=1.22.0"
    }
  }
  backend "consul" {
    address = "localhost:8500"
    scheme = "http"
    path = "my-ucloud-project"
  }
}

provider "ucloud" {
  public_key = "JInqRnkSY8eAmxKFRxW9kVANYThfIW9g2diBbZ8R8"
  private_key = "8V5RClzreyKBxrJ2GsePjfDYHy55yYsIIy3Qqzjjah0C0LLxhXkKSzEKFWkATqu4U"
  project_id = "org-a2pbab"
  region = "cn-sh2"
}

resource "ucloud_vpc" "vpc" {
  cidr_blocks = ["10.0.0.0/16"]
}
Be careful to replace the public_key, private_key and project_id in the code with your own.
In the terraform section, we added the backend configuration section, specifying that localhost:8500 is used as the address (that is, the beta Consul service we just started), specifying that the http protocol is used to access the address, and specifying that the tfstate file is stored in the Consul key-value storage service under the my-ucloud-project path.
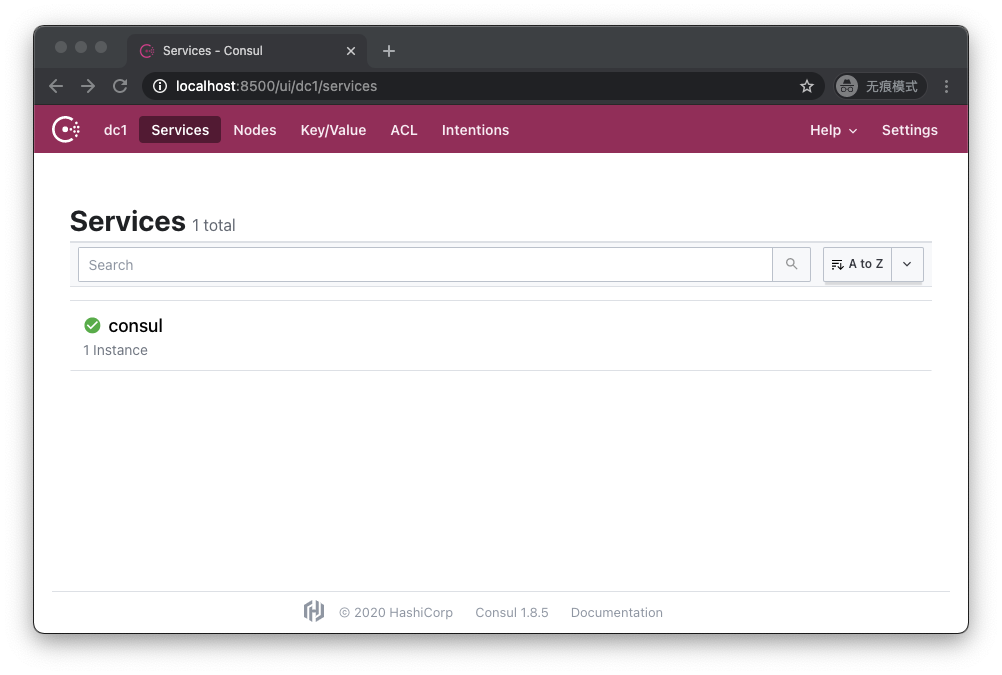
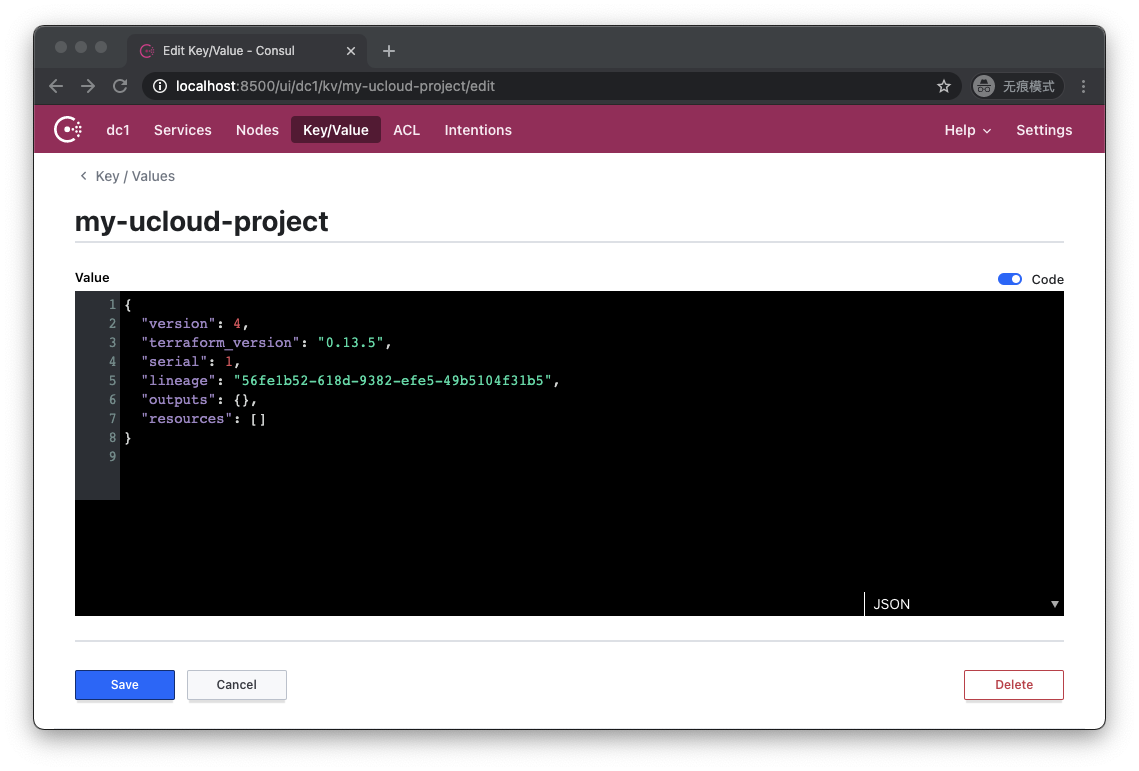
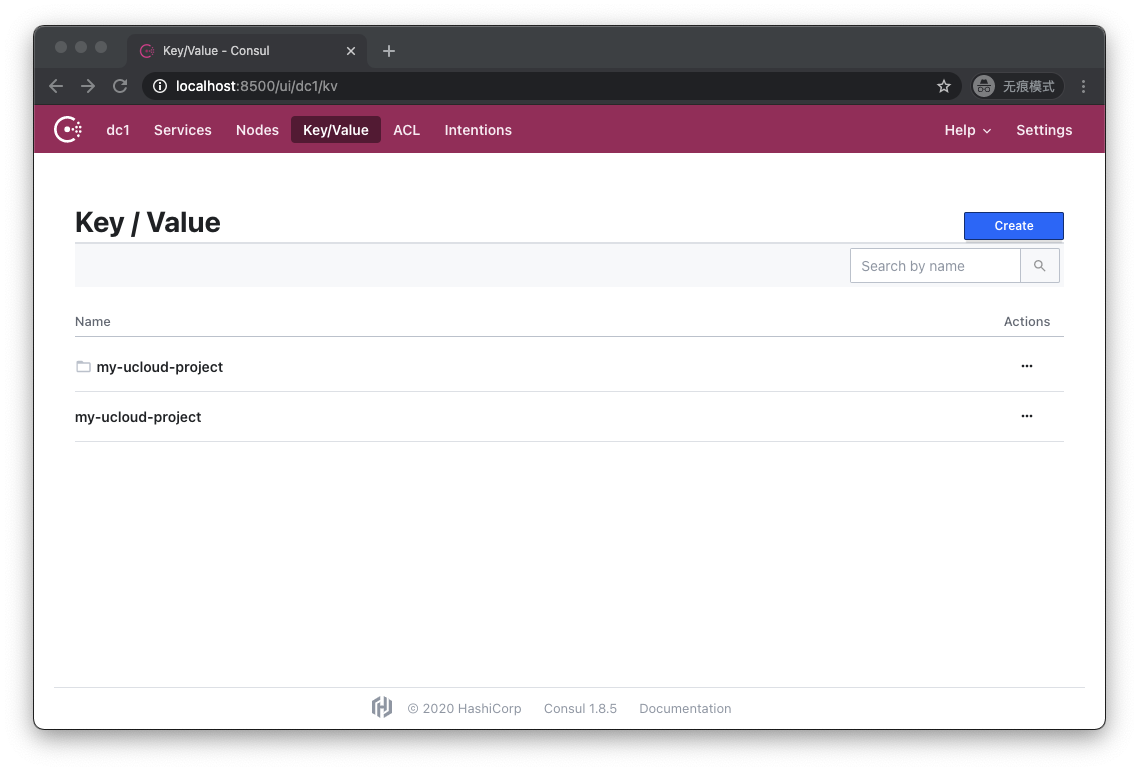
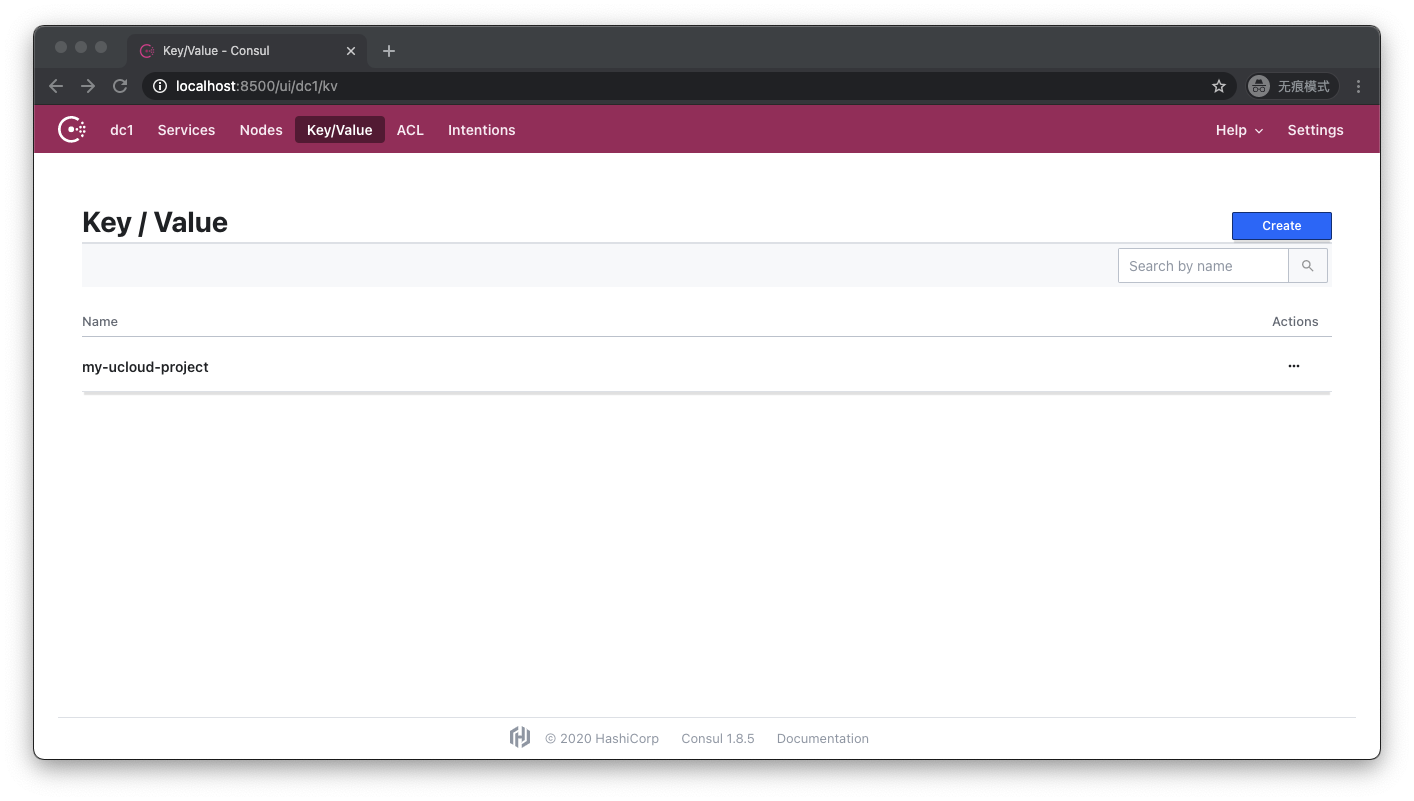
When we finish executing terraform apply, we visit http://localhost:8500/ui/dc1/kv
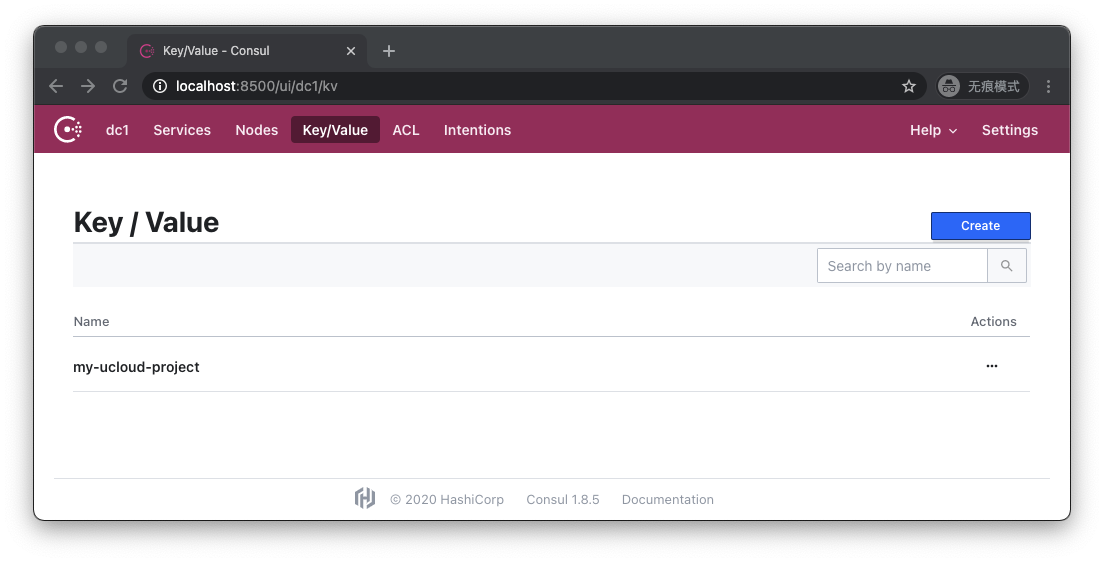
You can see my-ucloud-project, click to enter:
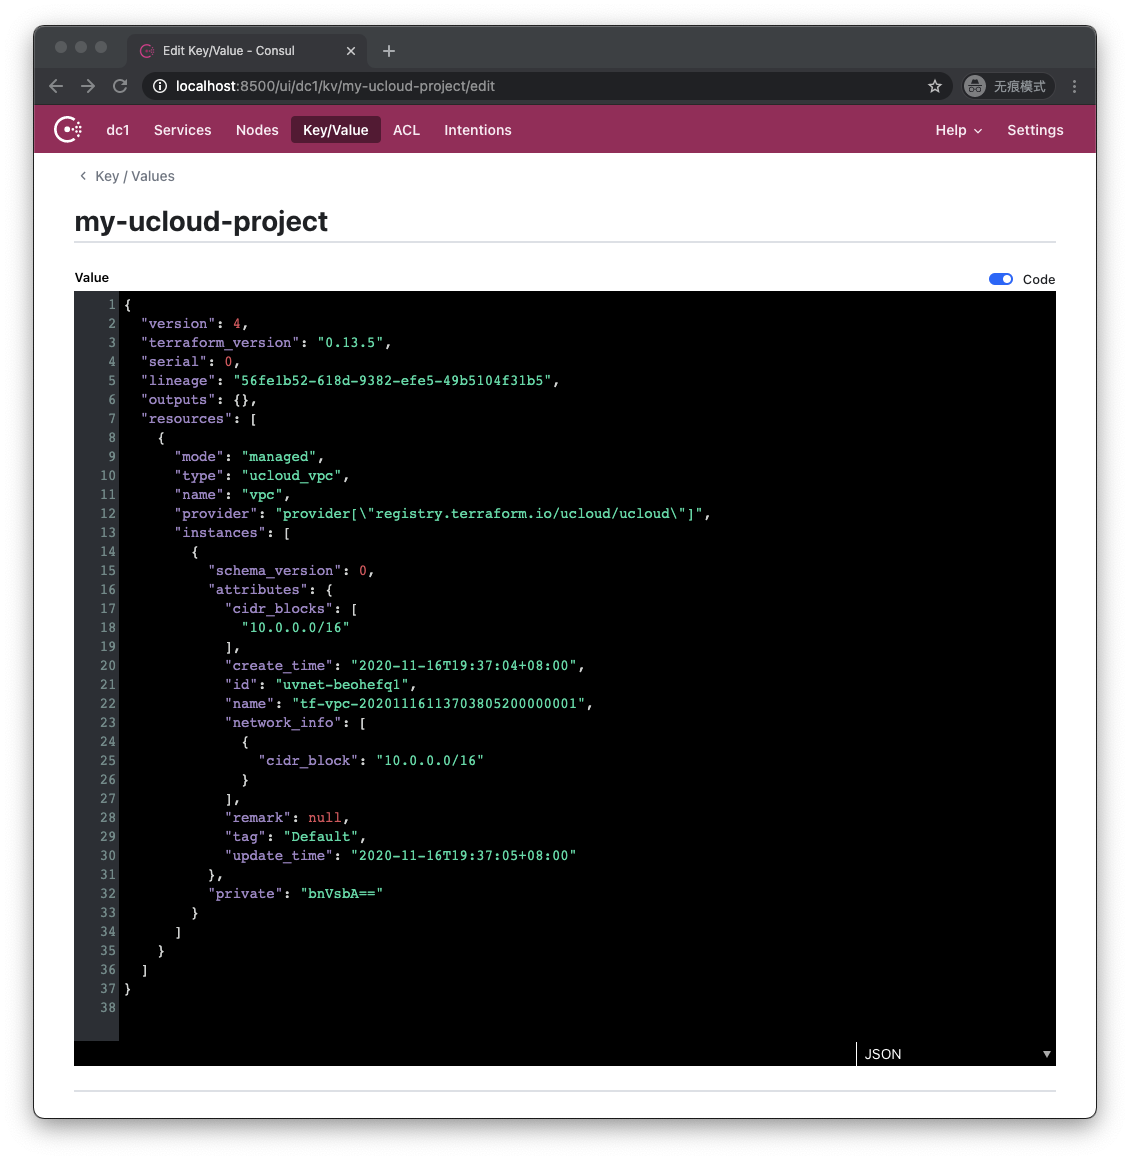
It can be seen that the content of the tfstate file originally saved in the working directory is saved under the key named my-ucloud-project in Consul.
Let's revisit http://localhost:8500/ui/dc1/kv after executing terraform destroy

As you can see, the key my-ucloud-project still exists. Let's click in:
As you can see, its content is empty, indicating that the infrastructure has been successfully destroyed.
4. Watch the lock file
So in this process, where exactly is the lock? How can we experience the existence of locks? Let's modify the code a little:
terraform {
  required_version = "~>0.13.5"
  required_providers {
    ucloud = {
      source = "ucloud/ucloud"
      version = ">=1.22.0"
    }
  }
  backend "consul" {
    address = "localhost:8500"
    scheme = "http"
    path = "my-ucloud-project"
  }
}

provider "ucloud" {
  public_key = "JInqRnkSY8eAmxKFRxW9kVANYThfIW9g2diBbZ8R8"
  private_key = "8V5RClzreyKBxrJ2GsePjfDYHy55yYsIIy3Qqzjjah0C0LLxhXkKSzEKFWkATqu4U"
  project_id = "org-a2pbab"
  region = "cn-sh2"
}

resource "ucloud_vpc" "vpc" {
  cidr_blocks = ["10.0.0.0/16"]
  provisioner "local-exec" {
    command = "sleep 1000"
  }
}
The change this time is that we add a provisioner of type local-exec to the definition of ucloud_vpc. We will specifically describe provisioner in the following chapters. Here readers only need to understand that after the Terraform process successfully creates the VPC, it will execute a command on the machine that executes the Terraform command line: sleep 1000, which is enough time for the Terraform process to Block long enough for us to observe lock information.
Let's execute terraform apply, this time apply will be blocked by sleep and will not complete successfully:
An execution plan has been generated and is shown below.
Resource actions are indicated with the following symbols:
  + create

Terraform will perform the following actions:

  # ucloud_vpc.vpc will be created
  + resource "ucloud_vpc" "vpc" {
      +cidr_blocks = [
          + "10.0.0.0/16",
        ]
      + create_time = (known after apply)
      + id = (known after apply)
      + name = (known after apply)
      + network_info = (known after apply)
      + remark = (known after apply)
      + tag = "Default"
      + update_time = (known after apply)
    }

Plan: 1 to add, 0 to change, 0 to destroy.

Do you want to perform these actions?
  Terraform will perform the actions described above.
  Only 'yes' will be accepted to approve.

  Enter a value: yes

ucloud_vpc.vpc: Creating...
ucloud_vpc.vpc: Provisioning with 'local-exec'...
ucloud_vpc.vpc (local-exec): Executing: ["/bin/sh" "-c" "sleep 1000"]
ucloud_vpc.vpc: Still creating... [10s elapsed]
...
Let's revisit http://localhost:8500/ui/dc1/kv
This time the situation has changed, we see that in addition to the key my-ucloud-project, there is an additional folder with the same name. Let's click into the folder:
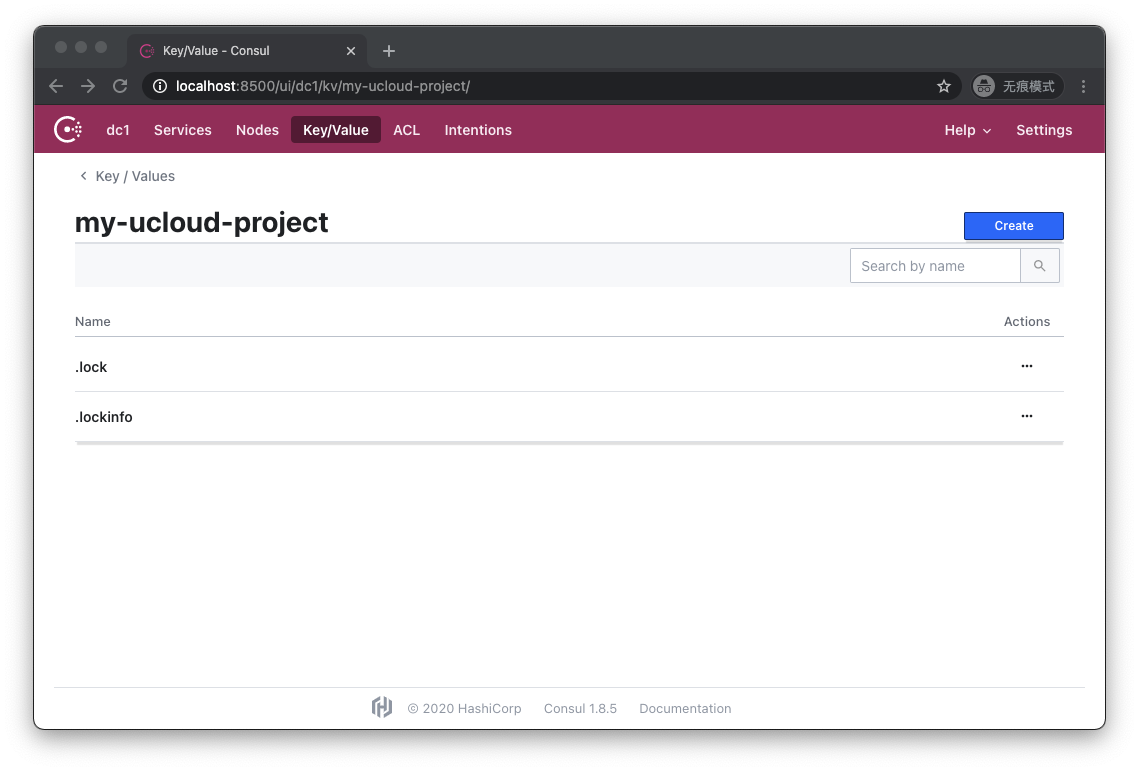
Here we successfully observed .lock and .lockinfo files. Let's click on .lock to see:
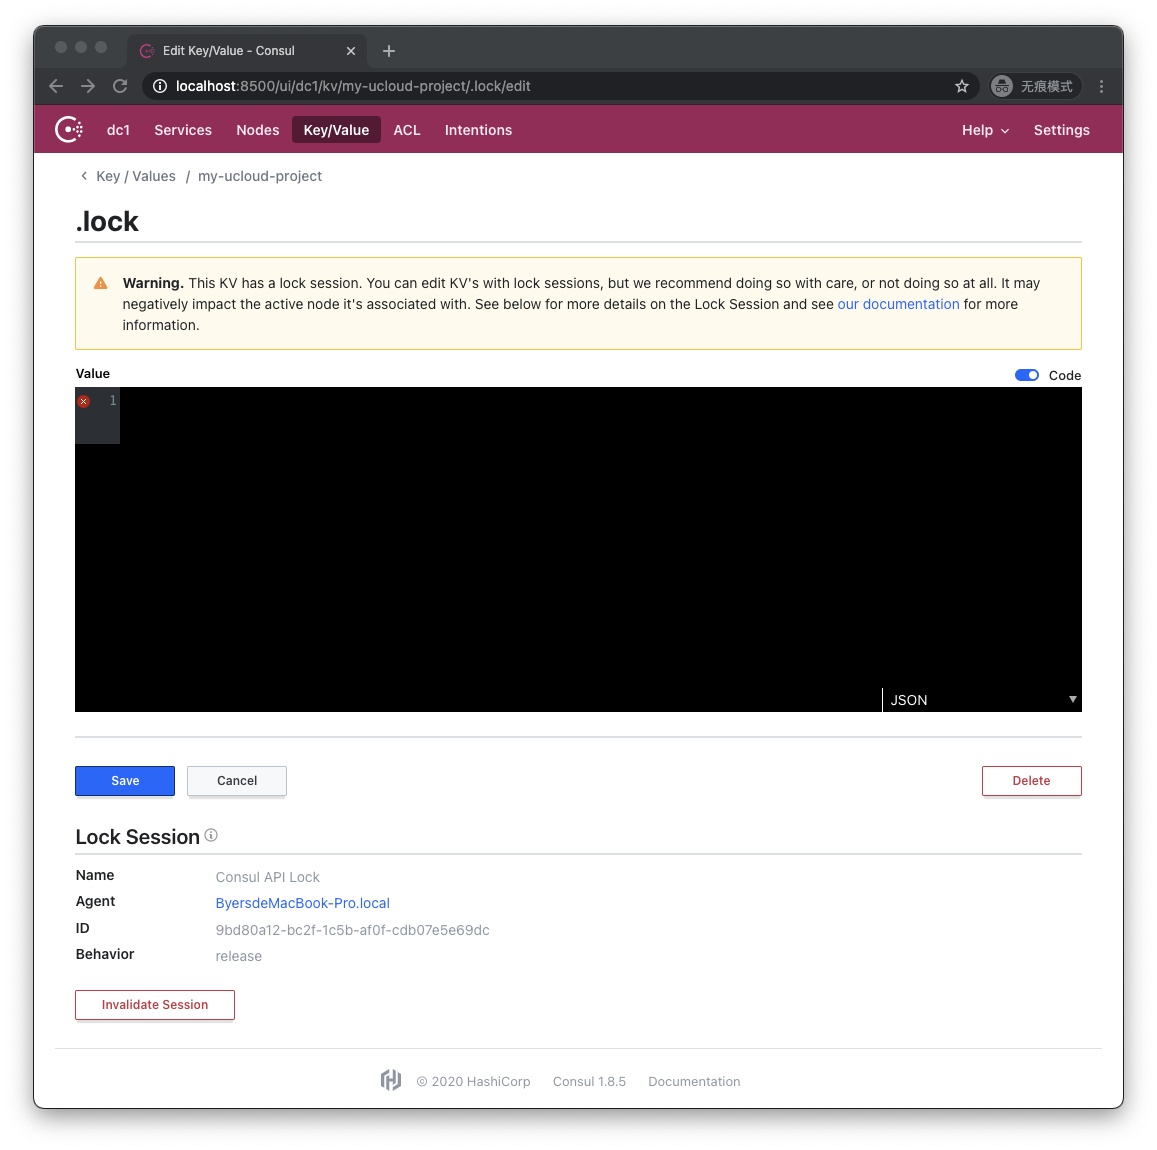
Consul UI reminds us that the key-value pair is currently locked and its content is empty. Let's see the contents of .lockinfo:
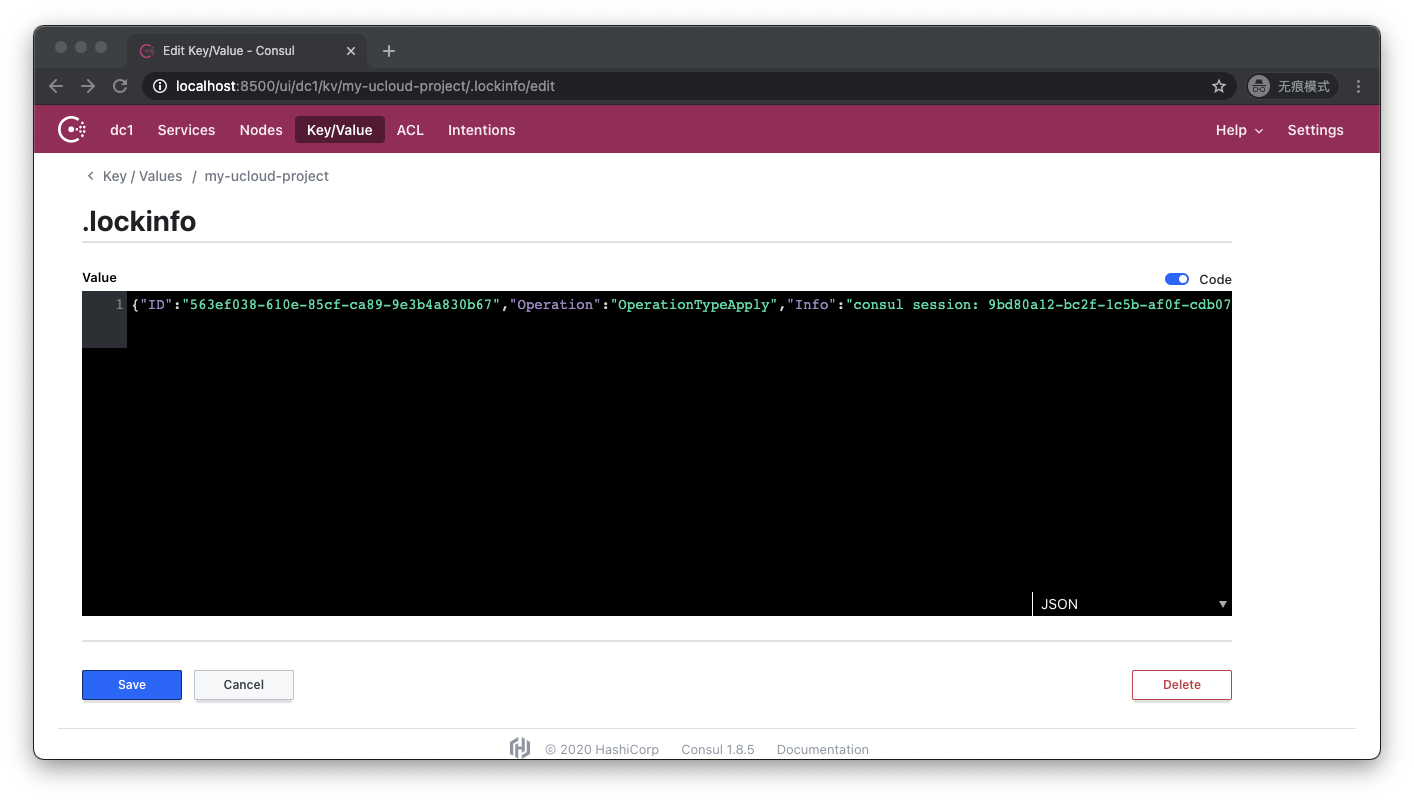
.lockinfo records the lock ID, the operation we performed, and some other information.
Let's start a new command line window and try another execution of terraform apply in the same working directory
$ terraform apply
Acquiring state lock. This may take a few moments...

Error: Error locking state: Error acquiring the state lock: Lock Info:
  ID: 563ef038-610e-85cf-ca89-9e3b4a830b67
  Path: my-ucloud-project
  Operation: OperationTypeApply
  Who: byers@ByersMacBook-Pro.local
  Version: 0.13.5
  Created: 2020-11-16 11:53:50.473561 +0000 UTC
  Info: consul session: 9bd80a12-bc2f-1c5b-af0f-cdb07e5e69dc


Terraform acquires a state lock to protect the state from being written
by multiple users at the same time. Please resolve the issue above and try
again. For most commands, you can disable locking with the "-lock=false"
flag, but this is not recommended.
As you can see, another attempt by another person to perform changes to the same tfstate at the same time fails because it cannot successfully acquire the lock.
Let's terminate the execution of the previously blocked terraform apply with ctrl-c and revisit http://localhost:8500/ui/dc1/kv
As you can see, the folder containing the lock is gone. When the Terraform command line process receives the ctrl-c signal, it will first write the currently known state information into the Backend, then release the lock on the Backend, and then end the process. However, if the Terraform process is forcibly killed or the machine is powered off, a lock will be left on the Backend, making subsequent operations impossible. At this time, we need to use the terraform force-unlock command to forcefully delete the lock. We will Described in detail in subsequent chapters.
Post comment 取消回复