prerequisites
CPU virtualization
Your CPU should support virtualization such as Intel VT or AMD-V. Enable it in your BIOS/UEFI before continuing. (For example, on my Ryzen system, this is an "AMD SVM" setting that must be enabled in the BIOS.)
Then install the Kernel Virtualization Manager (KVM) and QEMU. For Fedora Linux, see the [documentation] here(https://docs.fedoraproject.org/en-US/quick-docs/getting-started-with-virtualization/). It's as simple as:
$ sudo dnf install @virtualizationThen start the libvirtdsystemd service and check if the kvm kernel module is running.
With KVM, x86 virtualization provides near-native performance, which means that CPU calls from the Mac virtual machine are routed directly to your processor in a safe manner without emulation penalty of any kind.
While graphics and general UI responsiveness will be slow, with KVM, as long as you have some powerful CPU, such as a newer Intel i7 or Ryzen 7, the software will run very fast.
Compare the efficiency of KVM to e.g. DOSBox, because DOS programs use low-level BIOS interrupts and real CPU modes, so full emulation is required. This simulation can be orders of magnitude slower, although this is not a problem when simulating DOOM on today's machines.
RAM, Disk Space
If you want to run Xcode, install at least 16Gb of RAM so you can allocate about 8Gb to the virtual machine.
You will need tens of gigabytes of disk space. Once you start installing software, QEMU "qcow" images expand like crazy until they reach the preset limit of 200 Gb. After a few days of use, my image files grew to 170 Gb. Therefore, please prepare an HDD/SSD with enough free space.
Docker
Since we'll be using the Docker-OSX project, you'll need to pull, run, and possibly create a Docker image locally. You may be lucky with podman, although it interacts with your system differently than Docker. YMMV. To install Docker, follow the installation guide.
Install Docker-OSX
Get familiar with the Docker-OSX download page. It has a nice, long readme file! Commands are subject to change, so see the readme for the latest version.
In a nutshell, Docker-OSX runs an Arch Linux container that executes QEMU and sets up a pre-installed or vanilla macOS image for you. It's extremely customizable: you can get started quickly with a single docker run command, but depending on your needs, you can customize multiple aspects of how your virtual machine runs, such as screen resolution, shared folders, USB passthrough, VNC connection etc.
Just run a base image. Select your OS version (Catalina, Big Sur, Monterey). I recommend going with Big Sur which is still supported, but not as new as Monterey, it may have some emulation issues.
docker run -it \
    --device /dev/kvm \
    -p 50922:10022 \
    -v /tmp/.X11-unix:/tmp/.X11-unix \
    -e "DISPLAY=${DISPLAY:-:0.0}" \
    sickcodes/docker-osx:big-sur
What does this do? It pulls a pre-built Big Sur image, forwards your /dev/kvm device and an X11 socket into the container. It exposes port 10022 inside the container on port 50922 in the host for SSH access (optional). It also sets an environment variable that tells the container which X display to use.
For managing Docker containers, if you don't want to deal with the command line, I recommend using the Docker extension for Visual Studio Code. Very convenient!
Basically, while the container is running, the QEMU virtual machine will continue to run. If you shut down the machine from within macOS, the container will stop. docker run starts a brand new container, but you can do this later via docker start.
Install OS
Once launched, you'll see the recovery installer for macOS:
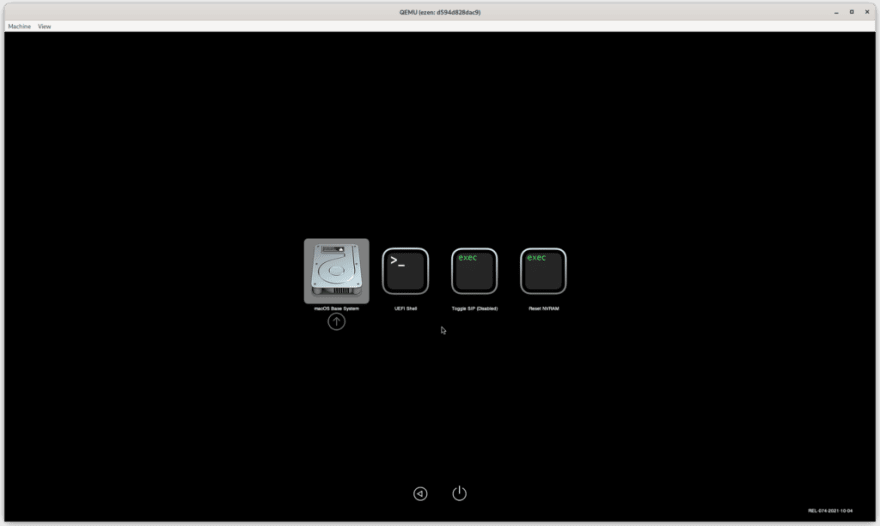
Bootloader for Mac VMs
You must follow the "Additional Boot Instructions" section of the README to format and install macOS on the virtual disk image (the image contains preinstalled Big Sur installation media).
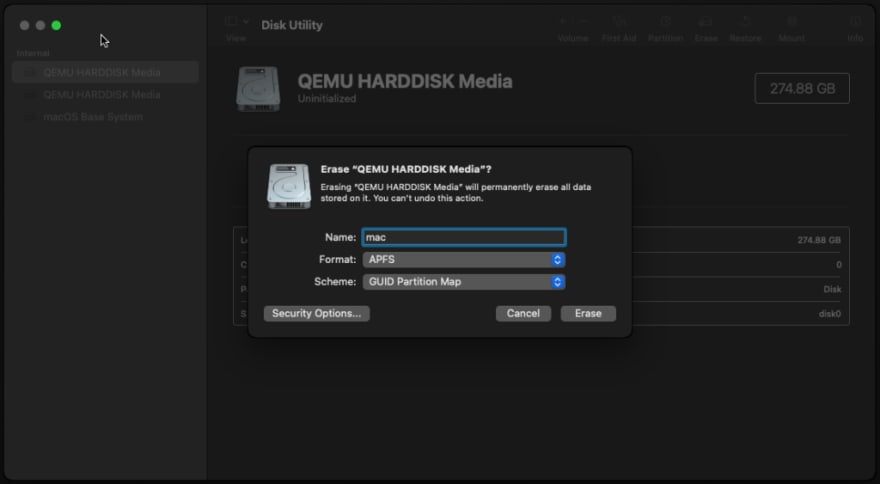
Format the virtual disk image
It's a very simple point-and-click job, and you'll receive your own macOS installation in no time!
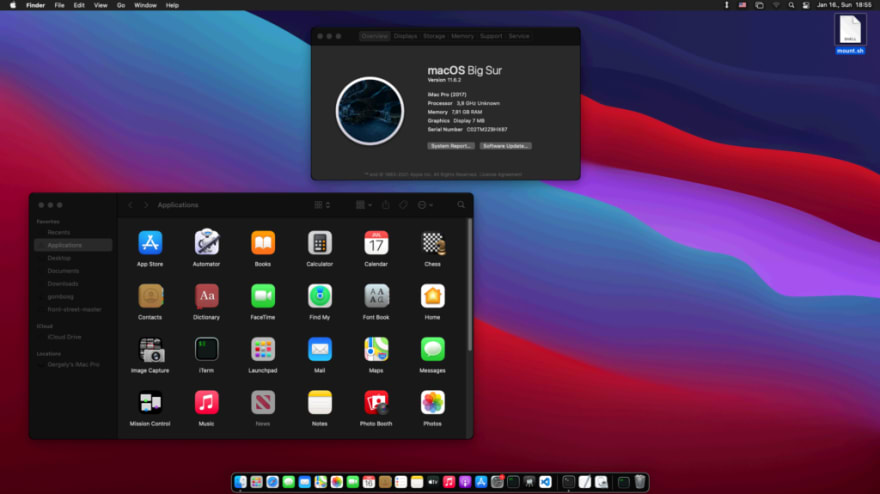
custom installation
Extract disk image
The first thing I recommend doing is extracting a macOS disk image to permanently install all the work and settings while experimenting with the VM setup. It's just a big file inside /var/lib/docker:
sudo find /var/lib/docker -size +10G | grep mac_hdd_ng.imgCopy the file to a convenient location with room to grow (2-300Gb!). From here, you can create your own custom image using one of the "bare" containers, where the file is simply mounted as a volume:
docker run -it \
    --device /dev/kvm \
    -v "${PWD}/mac_hdd_ng.img:/image" \
    -v /tmp/.X11-unix:/tmp/.X11-unix \
    -e "DISPLAY=${DISPLAY:-:0.0}" \
    sickcodes/docker-osx:naked
From here, for convenience, I recommend that you create a text file to store the version of the docker run command. Time to crack!
Add RAM and CPU
By default, VMs are created with only 4 cores and 4 Gb of RAM. Why not use more? Depending on your system, add parameters -e RAM=8 -e CPU_STRING=16 to make it faster, faster!
Shared folder from host
This is useful because you might want to share some files from the host. Unfortunately, this is not simple. Because the web works out of the box, if it's just some smaller files, you might actually be better off sharing files through a cloud provider like Dropbox!
See instructions here. You basically pass the folder name as a docker run parameter, -v "$HOME/mac/shared:/mnt/hostshare" and add some extra QEMU parameters that define this folder as named hostshare. Also, Inside the virtual machine, after every boot, you have to mount this folder: sudo -S mount_9p hostshare.
In the Finder's menu bar, click Go - Computer to access this shared folder. This shared folder is not as fast as a native "qcow" disk image; don't use it for folders with thousands of files, such as Git repos, it will be a slow experience.
write to shared folder
You may notice that you cannot write to the shared folder. This is because of the way the Linux permission system works: every user has an ID associated with every file. This ID is actually used instead of your username when determining file system permissions.
macOS is also a POSIX compliant operating system and uses the same access model, but your macOS user will most likely have a different ID by default, so the host OS will deny permission.
Making the shared folder writable by anyone might work, but is bad from a security standpoint. Fortunately, there are some commands you can use to change your macOS user ID. See the guide here. Not super complicated, but not very simple either. If you plan to do this, I recommend doing this before installing any software in your VM, as every file will need to reset their user ID.
Networking, access port
Networking in Docker is inherently difficult, plus we're getting this VM running in QEMU. Ouch. You may have different use cases other than browsing the web, which should work out of the box.
Forwarding ports from the VM to the host, e.g. running nginx or some server backend in the VM is a valid use case. For each port forwarded, some additional parameters are required when setting up the container, see the README section here.
The host port can also be accessed from the VM by forwarding the corresponding port to the container using the Docker parameter localhost, ie access. -pQEMU sets the host's localhost (inside Docker!) after 10.0.2.2,
Set up host network
If you don't want to separately forward ports into the Docker container, you can choose to use the "host network" driver. In this case you can pass 10.0.2.2. This is also a disadvantage from a security point of view: only do this if you know what you are doing.
Using a VNC client
The default QEMU window will do the job, but accessing your VM via a VNC client is much more convenient. It has the following advantages:
- No need to stop the virtual machine when closing the emulator window
- Display the host's mouse cursor for a smoother experience
- Capture keyboard shortcuts like CMD+C.
- "Insert" from the host clipboard by typing (even without direct clipboard sharing)
- Change connection quality etc.
I recommend using the Remmina VNC client as it is very advanced, but feel free to use your own. There are various ways to get a VNC-capable version, the easiest is probably to build a custom Dockerfile in the repo (edit the file if you need a different resolution):
$ git clone git@github.com:sickcodes/Docker-OSX.git
$ cd Docker-OSX/vnc-version
$ docker build -t docker-osx:nakedvnc -f Dockerfile.nakedvnc .
Make a note of the VNC password that was printed when you built the container! Each run will be permanent, so you can save it to your VNC client. You can connect to it via localhost:5999. Don't forget to set "grab input" and "hide menu bar" in QEMU menu bar and VNC client.
If you terminate the VNC connection, your macOS system will continue to run. Neat!
Here is my example Docker command for reference, which runs a VNC-enabled container (built above) with a shared folder, custom image, and host network.
docker run \
    --device /dev/kvm \
    --network host \
    -v "$HOME/mac/mac_hdd_ng.img:/image" \
    -v "$HOME/mac/shared:/mnt/hostshare" \
    -e EXTRA="-virtfs local,path=/mnt/hostshare,mount_tag=hostshare,security_model=passthrough,id=hostshare" \
    -e RAM=8 \
    -e CPU_STRING=16 \
    docker-osx:nakedvnc
Post comment 取消回复