What is the level?
Docker containers are the building blocks of applications. Each container is an image, and there is a read/write layer on top of a stack of read-only layers
These layers (also called intermediate images) are generated when the commands in the Dockerfile are executed during the Docker image construction
For example, this is a Dockerfile used to create an image of a node.js web application. It shows the commands executed to create the mirror
FROM node:argon
# Create app directory
RUN mkdir -p /usr/src/app
WORKDIR /usr/src/app
# Install app dependencies
COPY package.json /usr/src/app/
RUN npm install
# Bundle app source
COPY. /Usr/src/app
EXPOSE 8080
CMD ["npm", "start"]
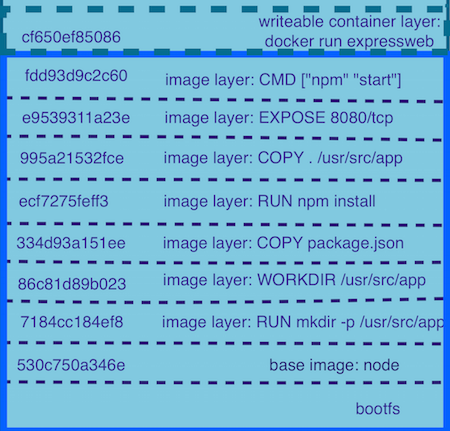
As shown in the figure below, when Docker builds a container from the above Dockerfile, each step corresponds to a command run in the Dockerfile. Each layer consists of files generated by running this command. With each step, the created layer is listed, represented by its randomly generated ID. For example, the layer ID for step 1 is 530c750a346e.
$ docker build -t expressweb.
Step 1: FROM node:argon
argon: Pulling from library/node...
...
Status: Downloaded newer image for node:argon
 ---> 530c750a346e
Step 2: RUN mkdir -p /usr/src/app
 ---> Running in 5090fde23e44
 ---> 7184cc184ef8
Removing intermediate container 5090fde23e44
Step 3: WORKDIR /usr/src/app
 ---> Running in 2987746b5fba
 ---> 86c81d89b023
Removing intermediate container 2987746b5fba
Step 4: COPY package.json /usr/src/app/
 ---> 334d93a151ee
Removing intermediate container a678c817e467
Step 5: RUN npm install
 ---> Running in 31ee9721cccb
 ---> ecf7275feff3
Removing intermediate container 31ee9721cccb
Step 6: COPY. /Usr/src/app
 ---> 995a21532fce
Removing intermediate container a3b7591bf46d
Step 7: EXPOSE 8080
 ---> Running in fddb8afb98d7
 ---> e9539311a23e
Removing intermediate container fddb8afb98d7
Step 8: CMD npm start
 ---> Running in a262fd016da6
 ---> fdd93d9c2c60
Removing intermediate container a262fd016da6
Successfully built fdd93d9c2c60
After the image is built, you can use the docker history command to view all the layers that make up the image. The image column (ie the intermediate image or layer) shows the randomly generated UUID associated with the layer
docker history <image>
$ docker history expressweb
IMAGE CREATED CREATED BY SIZE
fdd93d9c2c60 2 days ago /bin/sh -c CMD ["npm" "start"] 0 B
e9539311a23e 2 days ago /bin/sh -c EXPOSE 8080/tcp 0 B
995a21532fce 2 days ago /bin/sh -c COPY dir:50ab47bff7 760 B
ecf7275feff3 2 days ago /bin/sh -c npm install 3.439 MB
334d93a151ee 2 days ago /bin/sh -c COPY file:551095e67 265 B
86c81d89b023 2 days ago /bin/sh -c WORKDIR /usr/src/app 0 B
7184cc184ef8 2 days ago /bin/sh -c mkdir -p /usr/src/app 0 B
530c750a346e 2 days ago /bin/sh -c CMD ["node"] 0 B
When the docker run command is executed, an image becomes a container.
docker run expresswebThe following figure is a schematic diagram of the container created by the run command. The container has a writable layer, stacked on top of the mirror layer. This writable layer allows you to make "changes" to the container because the lower layers in the image are read-only.
Where is the layer found?
To gain insight into each layer of the image and view its contents, you need to view the layers on the Docker host:
/var/lib/docker/aufsIf you run Docker on OSX, the Docker host is actually a linux virtual machine named docker machine. On OSX, you can ssh into the docker machine to view the aufs directory:
$ docker-machine ssh default
                        ##.
                  ## ## ## ==
               ## ## ## ## ## ===
           /"""""""""""""""""\___/ ===
      ~~~ {~~ ~~~~ ~~~ ~~~~ ~~~ ~ / ===- ~~~
           \______ o __/
             \ \ __/
              \____\_______/
 _ _ ____ _ _
| |__ ___ ___ | |_|___ \ __| | ___ ___| | _____ _ __
|'_ \ / _ \ / _ \| __| __) / _` |/ _ \ / __| |/ / _ \'__|
| |_) | (_) | (_) | |_ / __/ (_| | (_) | (__| <__/ |
|_.__/ \___/ \___/ \__|_____\__,_|\___/ \___|_|\_\___|_|
Boot2Docker version 1.12.3, build HEAD: 7fc7575-Thu Oct 27 17:23:17 UTC 2016
Docker version 1.12.3, build 6b644ec
docker@default:~$ df -h
Filesystem Size Used Available Use% Mounted on
tmpfs 896.2M 192.1M 704.1M 21% /
tmpfs 497.9M 0 497.9M 0% /dev/shm
/dev/sda1 17.9G 2.4G 14.6G 14% /mnt/sda1
cgroup 497.9M 0 497.9M 0% /sys/fs/cgroup
Users 464.8G 110.0G 354.8G 24% /Users
/dev/sda1 17.9G 2.4G 14.6G 14% /mnt/sda1/var/lib/docker/aufs

docker@default:~$ ls /mnt/sda1/var/lib/docker/aufs
diff layers mnt
The /var/lib/docker/aufs directory points to three other directories: diff, layers, and mnt.
- The mirror layer and its contents are stored in the diff directory.
- The stacking method of the mirror layer is located in the layer directory.
- The running container is mounted under the mnt directory (mounting will be explained in detail below)
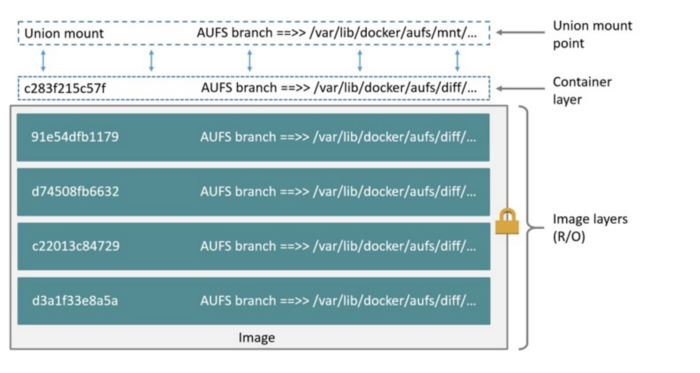
In order to better understand how layers work, I think it is interesting to discuss the AUFS storage driver. If you are not familiar with this, here are a few keywords that I think I’m glad to know:
- Union Mount is a method of combining multiple directories into one directory, which seems to contain the contents of all directories.
- AUFS stands for another joint file system or advanced multi-layer unified file system (starting from version 2). AUFS implements joint mounting for Linux file systems.
- The AUFS storage driver uses a joint mounting system to implement the Docker image layer.
- AUFS branch-each Docker image layer is called an AUFS branch.
Using the Union file system is very cool, because they merge all the files of each mirror layer together and present them as a read-only directory at the union mount point. If there are duplicate files in different layers, the files in the previous layer are displayed.
I really like one of the images in the Docker documentation shown below, which shows each layer of the Ubuntu image as an AUFS branch and where its files are stored on the Docker host in the federated file system. In addition, it displays these layers as a unified view in the joint mount points exposed in the writable container layer.
Why use a joint mount system for Docker?
The use of a joint file system allows each layer created to be reused by an unlimited number of mirrors. This saves a lot of disk space and allows the image to be built faster because it just reuses existing layers. In addition, the read/write top layer provides the appearance of the image that can be modified, but the read-only layer below actually maintains the integrity of the container by isolating the contents of the file system.
As an example of saving disk space, I always want to design my docker image to be as light as possible. Suppose I need to create a named data volume container for the log files of my web application. The first thing that comes to my mind is what base image can I use to make this volumetric container lightest. I decided to use tianon/true image because it is 125 bytes super lightweight. But then I remembered that I was using Ubuntu basics for my web application. Therefore, if I already have an Ubuntu image, it's actually best to reuse the basic image for my data volume container instead of using tianon/true to create more layers.


Post comment 取消回复