Compose Generator is a command line tool that can help you set up a Docker project as quickly as possible. The command line interface (cli) acts as an assistant for common Docker tasks
The focus of Compose Generator is to improve the productivity and efficiency of common use cases, such as setting up Docker and Docker Compose and deploying software stacks. It utilizes predefined service templates, and you can use these templates to get exactly what you need and want. No more and no less. Compose Generator is also extensible
Deploy the project
With Compose Generator, you only need to perform the following four steps:
- Install Compose Generator (described below)
- Clone the project repository from VCS
- Run compose-generator install to install Docker and Docker 4. Compose (if you have already installed Docker and Docker Compose, you can skip it)
Run compose-generator -r to generate your deployment configuration and then run it

Generate Docker Compose configuration
Compose Generator can be seen as a deployment assistant, like a wrapper for Docker installation. As shown above, Compose Generator can be used to install Docker and Docker Compose on your system, so you only need to care about installing Compose Generator first. As the name suggests, the main function of Compose Generator is to generate Docker Compose configuration for your project. In addition, Compose Generator can generate secrets (such as database credentials, etc.), manage volumes, networks, environment variables, etc.
In the following example, we will deploy a basic Angular application that connects to the Spring Boot API and MySQL database. Compose Generator supports a variety of service templates (the trend continues to grow)
Deployment demo
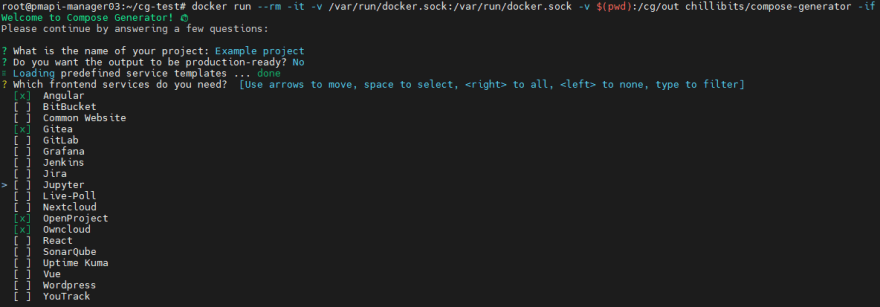
docker run --rm -it -v /var/run/docker.sock:/var/run/docker.sock
     -v $(pwd):/cg/out chillibits/compose-generator
Docker pulls the image and runs it in interactive mode. The $(pwd) placeholder represents that the current path on your Docker host system is mapped to the directory in the /cg/out container. This means that the generated output file, such as docker-compose.yml, will later be located in the directory where you executed the above command

Compose Generator will ask for your project name and whether you want to create a production-ready configuration instead of the default development configuration, which will hide your service behind the proxy. Compose Generator provides various predefined service templates, which you can arrange according to your needs just like in the building block system. For our example, we will choose Angular in the front-end part, Spring with Maven back-end part, and MySQL database part. For each item you select from the list of templates, Compose Generator will ask you service-specific questions, which are important for setting them up. After answering all the questions in MySQL, you can see that the Compose Generator pre-selected PhpMyAdmin because it is MySQL's default database management system. You can deselect it or press Enter to continue

Compose Generator will generate the following file structure in the directory where it is called:
current directory
├─volumes
│ ├─volume1
│ ├─volume2
│ ├─volume3
│ └─...
├─.gitignore
├─.cg.yml
├─docker-compose.yml
└─environment.env
The docker-compose.yml file contains your Docker Compose configuration. If your container needs any secrets, they will be stored in the environment.env file, which will be attached to all relevant containers at runtime. As shown above, Compose Generator will also create a volume catalog for you. According to the stack template you choose, there are already files (such as configuration files, etc.) in the volume directory, which can reduce your burden as much as possible.
The environment.env file contained in the .gitignore root directory file accidentally made any secrets to VCS.
.cg.yml is the configuration file of Compose Generator itself, used to remember some of your choices.
Remove service from configuration
Imagine that you have generated stacks of Angular, Spring with Maven, MySQL and PhpMyAdmin, but you want to switch to MongoDB and you have to deal with multiple documents, just like the data structure in your Spring application.
What you can do is to ask the compose generator to remove the services MySQL and PhpMyAdmin and add MongoDB instead.
To delete the first two, you can execute the following commands in the directory where the docker-compose.yml configuration file is located:
compose-generator removeSelect the two services MySQL, PhpMyAdmin and press Enter. Compose Generator will remove these services from your compose configuration without leaving any residue, such as unused volumes, networks, etc.
Add service to configuration
Now to increase the service MongoDB, you can execute the following command:
compose-generator add mongodbThe ocker-compose.yml file should now contain a service database-mongodb and service, database-mysql and db-admin-phpmyadmin should disappear


Post comment 取消回复